More and more, the World Wide Web is the final resting place for most of our images today. With the decline of film in favor of digital cameras, more and more people today are using The Web for displaying their work. This has led to an explosion in the so called “digital darkroom,” where images are captured and processed electronically instead of chemically.
Of the many program choices available to the photographer, arguably the most well-known of these tools is Adobe Photoshop. The current incarnation of Photoshop is Creative Suite 5, or CS5 for short. Photoshop affords the photographer with a vast array of tools from RAW image processing to manipulation of exposure, color control and balance, sharpening, retouching, and much more.
In this piece, I would like to talk about two of the tools used most often (or not) by photographers to manage contrast and brightness.
The Tools
Most readers are likely familiar with Curves and Levels. Of the two, Levels is the most used with Curves being a bit of a mystery to most and unfortunately it gets little use as a result.
As most other tools in Photoshop, the Curves and Levels tools work on the general principal of re-mapping brightness data in your image from one level to another. Where the two differ is in their power and intent.
The Levels tool has very few controls and acts on the image data in broad raw strokes. The Curves tool in contrast offers you much greater control of the adjustments you intend or desire to do. Each tool serves a purpose and generally a photographer should use both. There is no reason to use one or the other and instead chose the one that best serves your intended purpose. You may find that with some images, one tool is all that’s needed.
The Levels Tool
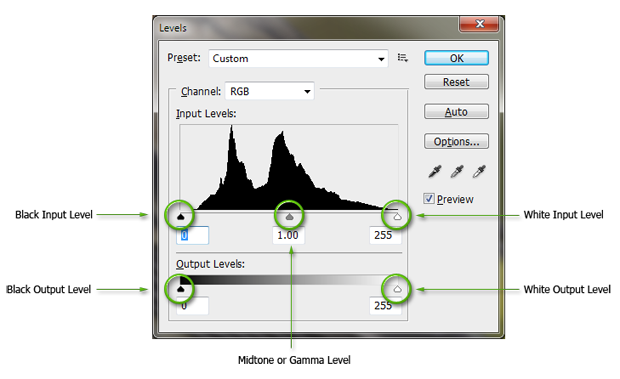
Let’s take a look at the tool and the various controls:

The way the tool works is by compressing or expanding the brightness data between the Highlights and the Shadows from a range of 0(black) on the shadows side, to 255 (white) on the highlight side. The central slider controls where the midtones reside relative to the position of the black point and the white point.
When moving the sliders, Photoshop will re-map the Black Input level (Black Point) or White Input level (White Point) to the corresponding output level below. This essentially moves the brightest point currently in the image, to a new location that is closer to the real limits the image can withstand. But let’s use real world examples.
One of the more useful features of the Levels tool is the display of the histogram as a reference point. The following image was captured as a RAW image with a Nikon D3 digital SLR camera and processed in Photoshop CS5 Adobe Camera Raw module.

Notice how moving the white point and black point sliders to the edges of the histogram, increases the contrast of the image in a positive way. The white fuselage of the aircraft is now white, not gray. Colors are also enhanced and the image “pops” more.
The drawback of the Levels tool is that it does not allow you to make adjustments on individual areas of the image. Its controls affect the entire range of tones in the image.
The Curves Tool
The Curves tool is far more powerful than the Levels tool. It is also more complicated to use and most photographers shy away from using it because of the mystery behind it. Indeed, when you first open the tool, it looks somewhat unfamiliar and unintuitive. Mastering the Curves tool can take some time, but with some basic knowledge of the tool, you may find it more like a scalpel compared to the bluntness of the levels tool. Let’s have a quick look at the tool and the various components that make up the interface:

As you can see, there many controls and information elements. Let’s go over some of the basic elements and what they do and how they give you feedback.
The central portion of the tool displays a grid which helps you visualize how the tones in your image are represented and how they will be re-mapped. The horizontal axis shows the current input levels in your image while the vertical axis represents the output level you would like to map the input to. You can think of levels as tones if that helps your understanding. The straight line in the center of the grid that runs vertically from the lower left to the upper right represents the boundary between the input and output controls you will be using.
Along this axis, you can place control points or anchors, 16 maximum, where you can move or re-map tones from the image to a different level. Think of anything you map to the right and below the diagonal as decreasing contrast and anything above and to the left of the curve to increase contrast. The relationship between two points will be what determines the amount of contrast. So let’s use our previous example and further explore the controls:

I have added three control points or anchors in order to achieve a desired result. One can add as many controls as needed to shape the curve to serve the purpose. Note that any part of the curve that does not have a control point is still affecting the underlying tones where the curve lies. A smooth curve allows tones to transition smoothly from one level to another.
In the example above, the left side is the original and the right side shows the modified tone curve. My goal was to increase contrast without affecting the highlights much. The left control point is remapping the shadows to a lower output level thereby darkening the shadows while the anchor point to the right of center is barely affecting the highlights. I did not want to clip or further increase the highlights in the image. The central anchor controls the distribution point as I have chosen. It can be placed anywhere in the curve or not needed at all. If you notice, the resulting tone curve is much more pleasing as the contrast has been increased without adversely affecting the highlights in the image and risk clipping.
This is a great example of how Curves can give you much greater control over how you want to map the tones or levels in your image than that offered by the Levels tool.
Even More Power
The Curves tool can do what the levels tool can do. However, if you feel more comfortable with the Levels tool, feel free to use it in conjunction with the curves tool. If you decide to do so, I recommend you use the Levels tool first and the Curves tool second. Better yet, use adjustment layers and place the curves layer above the levels layer.
The Curves tool also allows you to have separate curves per channel which is very powerful in removing color casts and/or individual channel clipping without affecting other tones in your image.
Some caveats to keep in mind. Be careful when using curves not to trigger posterization. Always use 16 bit mode to edit your images to maximize the space you have to move your data and convert to 8 bit on final output. Also look for hue changes as a result of wide re-mappings of control points.
Final Words
The difference between Levels and Curves tool is fairly straightforward. The Levels tool offers only three simple controls to redistribute or re-arrange the tones in your image: Shadows, Highlights and Midtones. The Curves tool allows you to remap any tone in your image to another level individually. This gives you greater control to achieve your desired result. You should use the Levels tool if your image is already at a level (pun intended) that is satisfactory to you and you only want to increase contrast and use up the entire tone range in your image. However if you desire a bit more control over how the individual tonal ranges in your image are mapped, the Curves tool gives you greater control.